

Ever since I read Tony Kuyper’s tutorial on luminosity masking, I have a really hard time staying away from them, particularly for landscape shots with a lot of tonal range. And with my recent fiddling with Lightroom, which offers a tremendous amount of control outside of Photoshop, you are constantly toying with the idea if the image will be better if you start playing around with such things as luminosity masking.

If you use Photoshop masks at all, you know what a powerful tool they can be for all sorts of things. Basic photoshop masks usually consist of black and white, the old adage – black conceals, white reveals. They are helpful in applying selective adjustments to your image, like dodging and burning specific areas. Luminosity masks put masks and tonal adjustments on steroids!! They create complex tonal maps of your image – and essentially replace that basic black/white mask with one that can have hundreds of shades of grey, black or white. You may find it hard to do only a simple curves adjustment after using these.
If you create this type of mask on one of your images, it offers VERY precise control over adjusting shadows, highlights, mid-tones – and is very specific. If you have bright highlights in your sky you want to tone down just a tad – this technique, in combination with say a curves adjustment layer, creates a mask that targets just those tones. You don’t have to go back and paint the mask area to limit the adjustments. If you have some shadows that need opening up, this tool allows you to target just those areas without changing anything else in your image. It can add incredible depth to an image by selectively controlling the luminosity. Below are the curves adjustment layers created for this particular image.
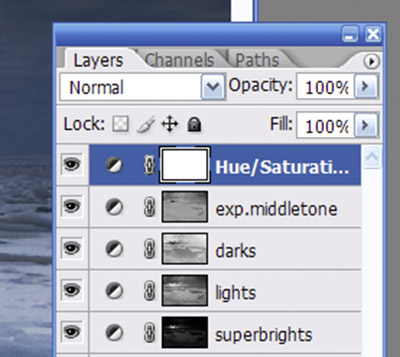
Try creating some of those masked areas with a paintbrush! Better yet, Tony offers some actions at the end of his tutorial that makes what sounds complicated very simple. For example, each of the above adjustment layers is curves adjustment layers, each created with the following steps;
- Run Tony’s action to create different channels – such as “darks”
- Go to the channels tab – and drag the “darks” channel created by the action down to the little selection icon at the bottom of the panel. This creates a complex selection based upon a tonal area.
- Go back to the Layers panel and click on adjustment layer icon -> Curves
- This creates a curves adjustment layer with a layer mask automatically from the selection you created in Step 2
- Adjust as needed
Using these actions, I can create specific adjustments for my highlights, super-bright highlights, light areas, shadows, and mid-tones in about 5 minutes. So it can become very tempting to constantly want to fiddle when you have this much power so easily over an image.
So I think the question is going to be constantly on my mind as I process more in Lightroom. However, for landscapes, particularly like this one, I think the addiction will need to be satisfied!


I have been meaning to get up to speed with Tony’s tutorial for sometime now. I think this is going to get me to do it. Nice write up.
Absolutely awesome shot Mark!
And, … looks like I have some downloading and installing to do.
You got my attention!!
Mark, first off, this shot is truly wonderful!!! Next, thanks for posting this information. I’ve downloaded the actions, now I”m on the hunt for a photo or two to unleash it upon! 🙂
glad to hear you’re feeling better (loved the previous image BTW).. I’m ashamed to admit that I’ve downloaded this tool but have yet to use it. I like the idea of using it MUCH more than I do dodging/burning which always seems to be ‘off’ no matter how delicate I use the tools. This is a great scene to show how useful it can be.. I remember those stacked up ice shots last year, some of the best I’ve seen.. this is no exception.
I have some snowy shots and no excuse not to try this out tonight.. between you, Mike B and Mike M, I’m gathering so much inspiration for days I can’t get out, which seem like way too many lately.
Mark, Thanks for posting that tutorial. I am going to try to read it tonight. I have heard luminosity masks talked about but never really used them…using the paintbrush you talk about instead. I guess I just never saw a step by step guide on using them. Hopefully this will be it since they would appear to be very helpful. Thanks.